· 8 min read
Advanced UX Prototyping and Playtesting (Without the Code!)

The question I ask is – can we go beyond? Every UX, Game, Product designer aspires enhancing prototypes to map the complete user flows, not just bits and bobs.
This article is divided into Tactical and Strategy layers. I will cover the former first.
As an UX Director, I have to continuously work on both Tactical and Strategy sides of UX with my team and stakeholder groups to enhance the quality, push the limits and strengthen the integrity of our UX pipeline and process.
In my last article Here, I detailed the process and benefits of low to mid fidelity prototypes where we built a device ready interactive version for user testing.
Example below of our low-fi proto. built during the last post.
My last post focused entirely on just prototyping a low-fi stand-alone feature. This time we will build a hi-fi prototype with inter-connected features, hence testing the entire user journey and core game flow.
High Stake Rapid Prototyping with Cross Discipline Teamwork
By high stake, I mean involving your top tier stakeholder group who, makes decisions on developing a product strategy, signs off on feature specs. during pre-production or before development starts. I will dwell more on this later in the article.
Get your key stakeholders and target audience excited from the GO, with cross-discipline UX Prototyping! Here is how..
Rapid prototyping a Match 3 Game without writing a single line of code
Today, with some ingenuity and combination of different design disciplines, It is possible to massively push the limits of your prototypes.
Let’s see how.
The genre we will be prototyping today is a generic Match 3 game, one of the most popular casual game category. I don’t advise getting to this stage without the steps covered in part 1 of this series.
Main flows and heuristics we will attempt to nail down with this prototype are:
- Initial loading – Keeping the player informed
- On-boarding/tutorial – Teach the player how to use your product
- Game map – Show player the path to progression
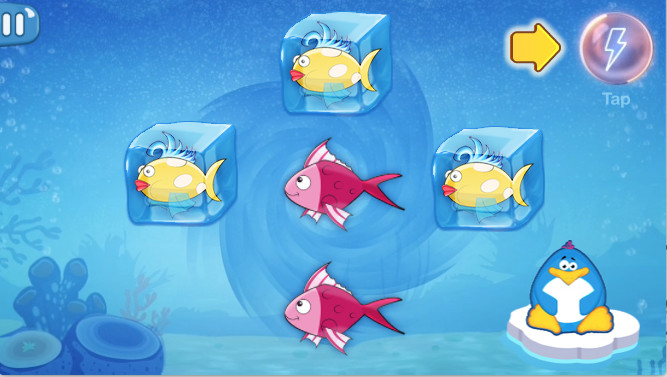
- Level design + Core loop
- Booster mechanics : Unlocking a booster
- Booster mechanics : Teaching players how to deploy a booster
- Completing the gameplay CORE loop
- Reward screen – Rewarding players for tasks they have completed
- Progression on map – Creating a sense of progression, how far the player has come
- Easter egg – A bonus test methodology (you will see when we get to the bottom 😉
In a nutshell, we will test all the 10 flows and heuristics, including the core loop, without writing a single line of CODE… Skeptical?
Read on..
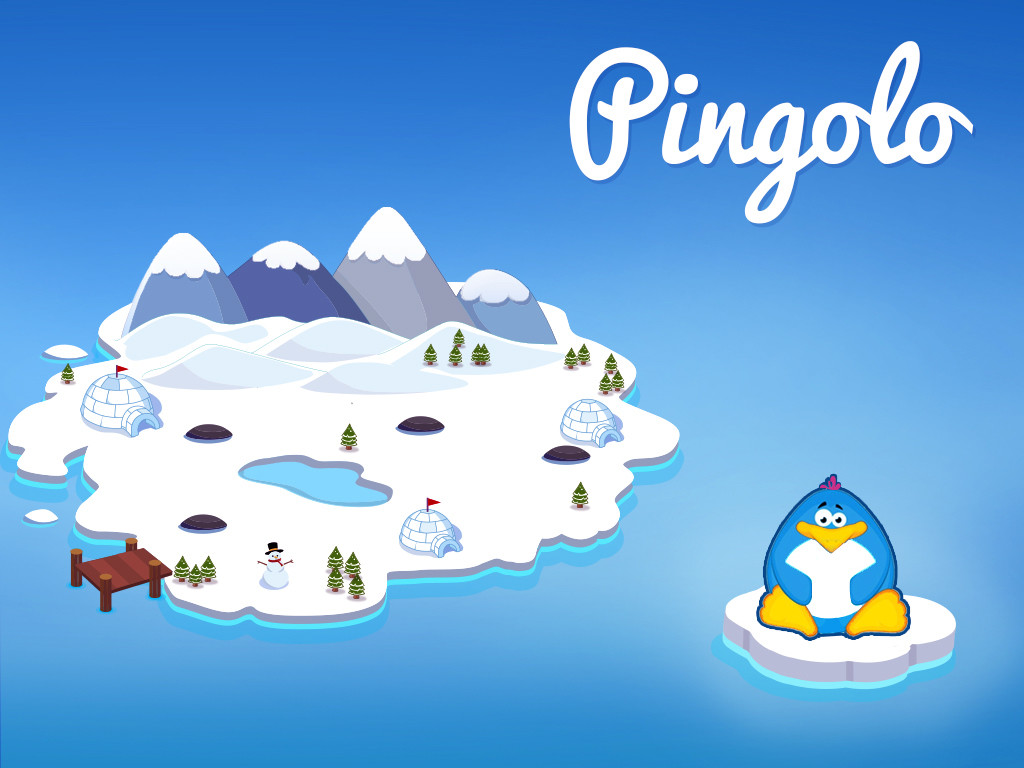
For this prototype, I looked at some of my old Portfolio and a particular image caught my eye. Even though I am focussed on UX, back in the days I started out doing heavy, UI/UX design and Concept art for games. I intentionally refrain from art nowadays in order to maintain a strict unbiased approach towards UX.
Ideally UX collaborates with Product, GD, Art and UI disciplines in a real world project, but for this article’s sake I will play the Unicorn 🙂
I found an old practice image which I believe could well serve the purpose of this article.
To keep this article concise, I will skip showing here some of the the early pre-production steps (covered in part 1). Here is the basic rough flow:
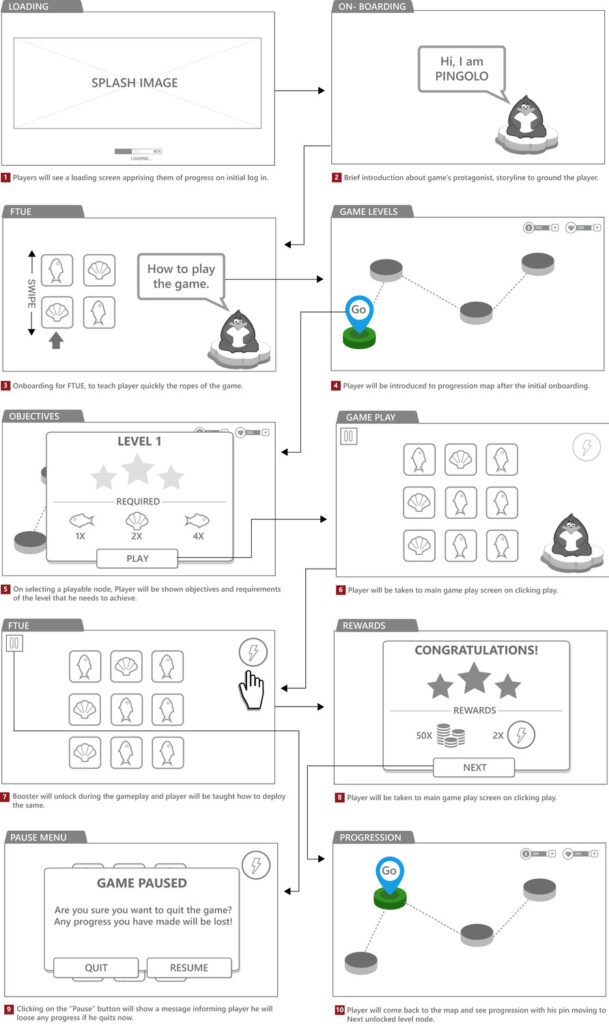
Using the flow above as base, I have created UI screens to compliment the major beats of the game.
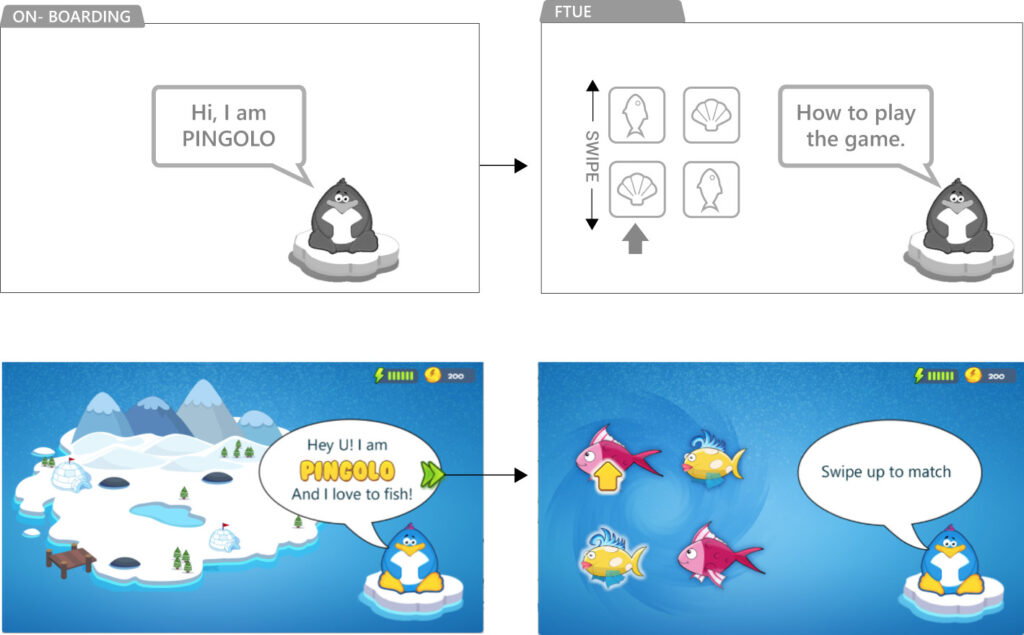
On-boarding & FTUE
Brief introduction & on-boarding to ground the player into the flow
Player map & objectives
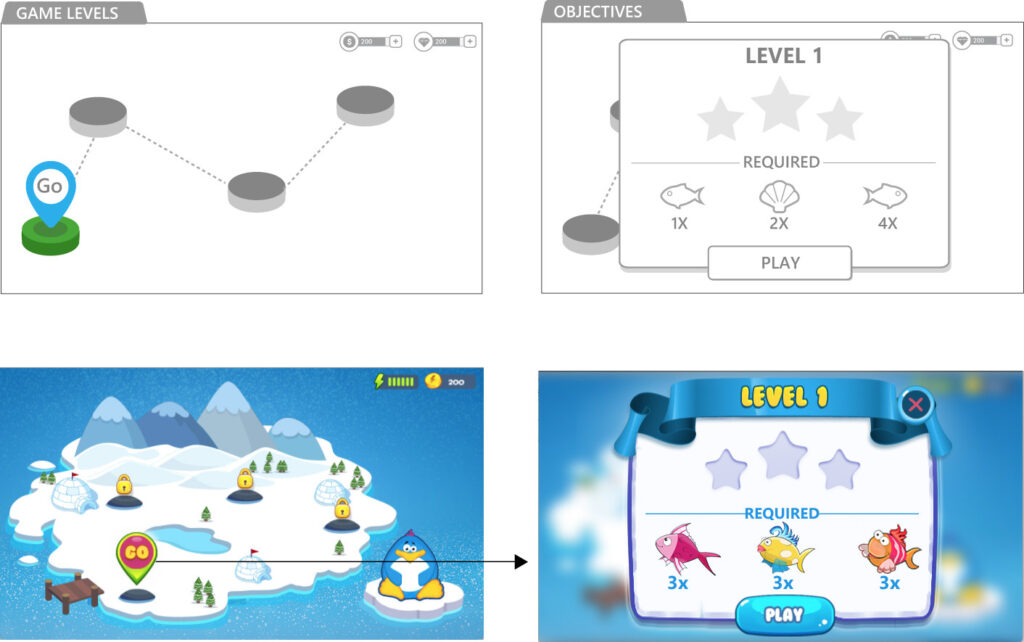
Core gameplay loop, rewards and progression flow

We would be building and testing a combination of different softwares like Photoshop, After Effects, Flash and Principle.
Next..The fun part! Bringing the flows, and screens above to life!
PROTOTYPE walk through: Video Diary
Put your headphones on, as I walk you through the functionality.
(Alternatively I have also placed an On-Device Demo of the prototype Here)
The timeline of putting together a prototype of this fidelity whilst working with other disciplines is generally around 5-7 days. Approximate development time even with hacked code might easily be 3 to 4 times the number.
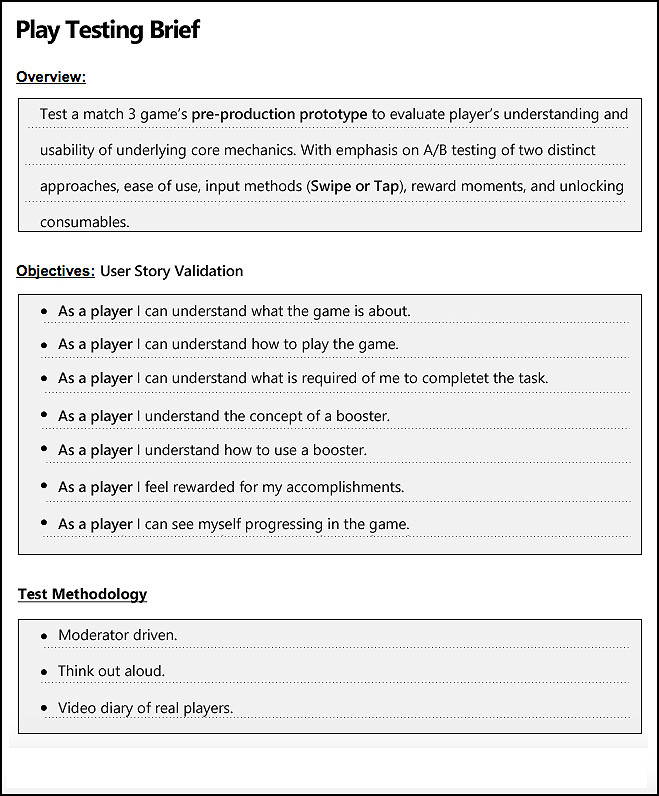
Play Testing Setup
I will be putting this prototype in a players hand and conduct a usability testing session, as we would in a real project setting, to:
Quantify the user experience and gauge the robustness of this prototype in real world play testing.
For play testing, as a rule, I work with external UX researchers and moderators to eliminate any bias and just be an unbiased observer. But now, I will dawn on my research hat to moderate this session.
Test Subject Persona:
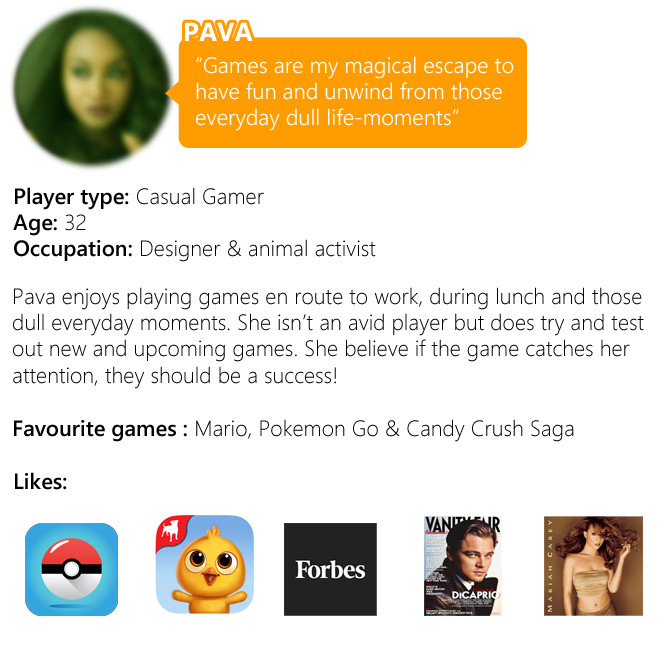
Handicap: Using a sample set of only 1 player limits cross-referencing and comparison mapping due to lack of additional data points. But serves the primary purpose of this article:
Ability to rigorously test a hi-fidelity prototype similar to a beta build with ZERO investment in code or development.
Conducting The Test: Video Diary
Put your headphones on, as I walk you through the functionality.
Compiling & interpreting the results : Quantifying the experience
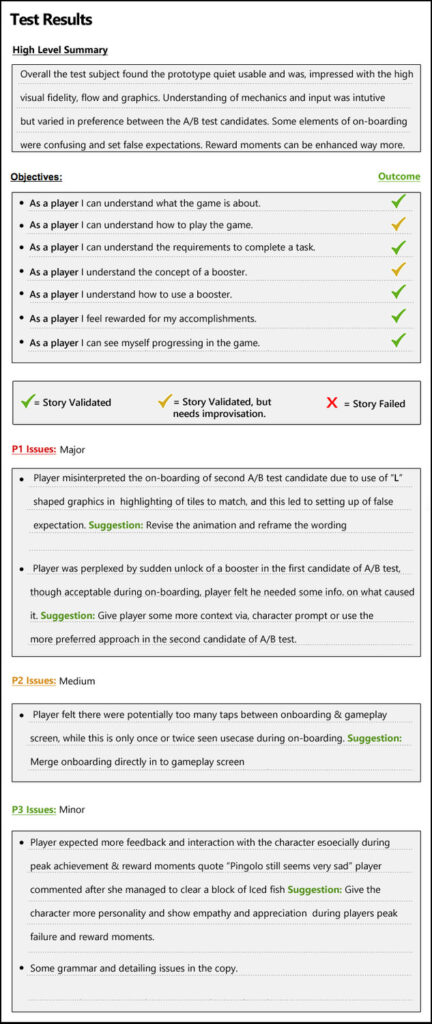
A/B Testing Results
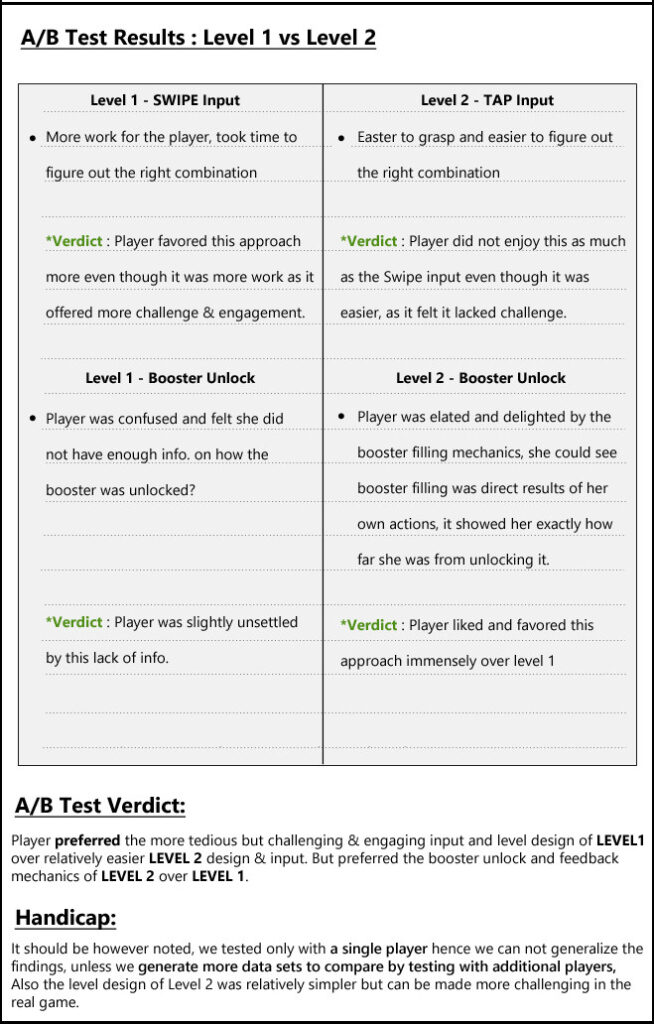
So far so good, but we are still missing a big part of the puzzle – The Strategy to be able to integrate the feedback we generated above in to our pre-production process.
Even more important than building a hi-fi prototype is first building a process pipeline. It’s no good having feedback which cannot be acted upon during pre-production. Without it any prototype may just as well be trashed.
Typical pyramid of pre-production may looks like as seen below

Injecting rapid prototyping is the only way to breach the wall early into pre-production and get the player buy ins.
There are 3 major barriers when building hi-fi prototypes during early stages of pre-production: Timing, Development Cost & Allocation of Resources.
1) Timing: Pre-production schedules are generally quiet tight and involve heavy iterations. Finding and defining the right time in your process is crucial to know when a hi-fi prototype needs to be built to avoid hampering the ideation process.
2) Development cost: This can be a major deterrent as dev/code time is the most precious resource from a ROI perspective in most software companies. So if we rely heavily on devs. to build a prototype, we may have to limit scope in what to prototype. For example, you may want to build and test 2-3 approaches (A/B Test) to an existing flow or mechanic for play testing. However this may require even more time from devs. which conflicts with point 1 as it will inflate the time needed for the pre-production or design sprint. Having a dedicated dev. resource to work in your UX team is great!, but all/most teams may not have that luxury.
3) Allocating production resources: Visual high fidelity will require near finished assets in the high-fid prototypes which imply pulling in resources from the production floor like Art and UI, even though these departments have their own ideation and conceptualisation sprints based on the specs. The key is to align their ideation sprints later in the pre-production phase so UX can utilise and test the UI and Art and it’s impact on users during play testing.
Workaround:
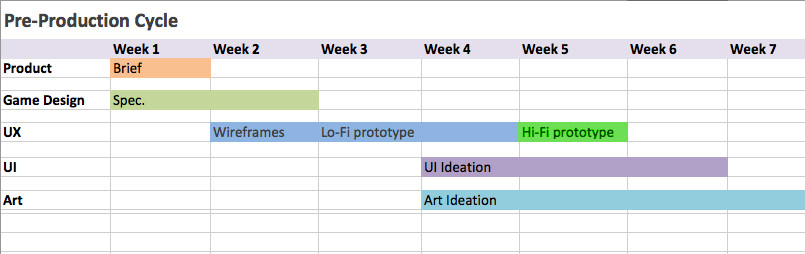
Above is just an example of a waterfall chart for pre-production in which as you can see, by aligning and overlapping conceptualisation stages of UI and Art with ending of low fidelity proto stage from UX, a window of opportunity is created where a Hi-Fid proto. can be built using first pass art and UI and combining it with low-fid proto built and already tested by UX, learnings can then be passed on to build the more polished version. If the project already has existing style guides, process is further accelerated.
Conclusion:
- As seen above it is possible to build and playtest intricate hi-fidelity prototpyes of simple to complex game loops and user flows, by cross discipline teamwork.
- Play testing is way important as you saw, even seemingly simple games like Match 3 can trip players if we don’t test in advance. Plenty of examples in the play test video.
- Post UX, Art and UI can add more complexity to the game screens, grey wireframes can not account for all use cases and players may misinterpret Devs. intentions, as we saw with use of “L” shaped graphic in the play test on-boarding.
- We can easily A/B test complex scenarios, mechanics without using any dev. time and iterate rapidly before reaching production, this makes play testing a FORESIGHT approach.
- You need both Tactical and Strategy elements to make this model work, while technical mastery of prototyping is one aspect, without the strategy and process in place to execute, play test and fold in the feedback in your pre-production, you can not justify the value addition & cost of building and play testing such hi-fid protos.
You can be a brilliant UX tactician, but without an underlying integration strategy, tactics are bound to fail. ~ Om
Let me know in comments which other game genres you would like to see prototyped in future articles of this series!
If you liked this post, you can check out my other Game UX Deconstructs. Feel free to connect with me for my future article